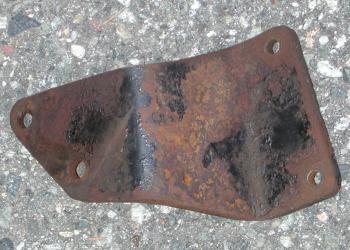
Buying this truck was a slight balancing act: I wanted to start using a nicely rebuilt 8' Fisher snow plow I had set up on my old F250, but to do this I would need to get my hands on the Chevy-specific parts. Most importantly, the push plates that bolt to the frame, and the pump mounting bracketry and drive belt sheave (pulley). I certainly wouldn't buy them until I owned the truck, and if I couldn't find those parts after buying it, I would probably just fix the brakes and exhaust and sell it to turn a quick buck (I have a great place to put vehicles near a highway with "for sale" signs on them - in fact, the Blazer this thing is replacing sold within a week). Luckily, right around the time I was working on the front brakes, I found a guy down in Massachusetts with a field full of trucks and plows and stuff like that, who was selling the sort of thing I needed. One drive out past myriad exits on the 495 and a couple hundred dollars later, I had some vintage "bolt up to your Chevy" Fisher iron. In this pile I brought home are the key ingredients - the push plates that mount to the frame and the headgear braces - and extras of several other hunks of steel:
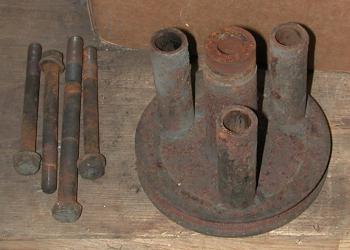
He also had these essentials - the pump mounting bracket, and a rusty old pulley with some bolts:
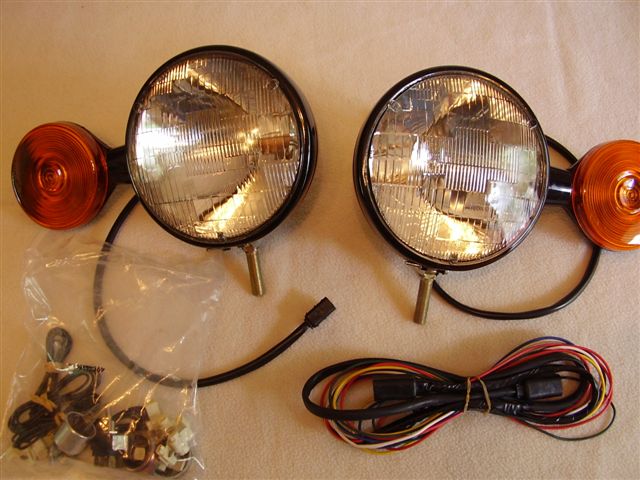 When I got it, the cutting edge was worn down, as they usually are, and the lower spring brackets were all at least half-gone. But the guy who sold it to me had three of those brackets made up from 3/8" thick steel he got from somewhere, and all I had to do was make a fourth. I had the remnants of the old ones torched off, cleaned up the mess a bit, and welded the new ones on with my trusty two-hundred-dollar MIG welder. I never expected those welds to survive, but they did. I added new spring bars, and had to get creative with several bar clamps four times in a row to install the springs and bars. I also got a new cutting edge and bolted it on. It's handy having a Fisher dealer 2 miles up the road. Although of course here in New England it seems there is one within hollering distance of every Dunkin' Donuts, pretty much. I got an almost new A-frame (the eight foot plows use a wider one than my previous 7 1/2 footer) at a metal scrapyard. I went there looking for some angle iron to press into service as some kind of wacky custom bracketing, and when I told the guy there what I was doing, he brought me across the yard to show me this piece. I got it for the price of retail scrap steel! I have new hoses and quick disconnects (I added a third for the "up" cylinder so I can pull the headgear in summer if I want), and a new "SLC" single lever control (joystick) and cables. The new underhood valve body mounting plate I bought and added a bracket to to use on my Ford was actually meant for a Chevy, so that's cool. Hmmmm. Now all I need to do is clean up and paint the push plates and beam, mount the underhood parts, drill the firewall holes and install the SLC control, and I should be good to go. The great part about the Fisher Engineering web site is that once you figure out how, you can find lots of old documentation there. Not only parts lists for various applications and plow generations, but the instruction sheet that would have been delivered with the new plow, telling the installer things like where to drill the firewall holes. Since the mounting hardware is all listed with the parts, I can also figure out what to buy (eleven Grade 5 9/16" by 1-1/2" bolts) that I don't have in my little yellow hardware bins. The heavy metal is back from my friend the powder coater (I got lazy and wanted to do it right), and with a few new bolts and the help of the original Fisher instructions, I have bolted it all up to the front of the truck. You might ask, "why do you need instructions to install six pieces of steel with a dozen bolts?" The answer is that installation has a few steps and parts that are not obvious. Things like installing the headgear brace bolts in the pushplates before installing them, avoiding having to undo them when you figure it out yourself. Parts like the 1/4" thick spacer that goes between the push plates and the front frame mounts. Little steps like undoing a couple of brake line bracket mounting bolts and bending the lines clear of the holes for the push plate bolts. A little reading saves a lot of headaches! Here is the main heavy metal installed, with the new plow lights mounted for "show": 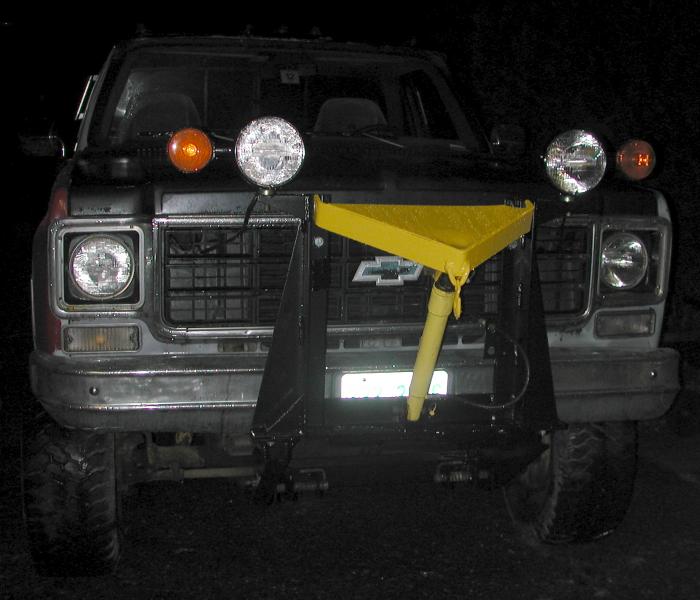 There will be a switch for the warning beacon. The reverse/loading lights get a 2 way/center off switch, so they can be "always on," "on with reverse only," or simply off.
I am using a second generation belt-drive plow system. By second generation I mean that the valve body is mounted under the hood, and is controlled by the SLC joystick. The third generation is where the SLC also runs a switch, and the pump is run by an electric motor bolted to it instead of a drive belt and pulley. At first, when I came to know about the electric version, I thought it was a good idea, but I lean towards the belt drive these days. The disadvantages of the belt drive are that it runs the pump all the time (you can remove the belt for the summer), and of course there's always the possibility of belt breakage and pulley jumping (both of which can be avoided with careful installation and appropriate maintenance). The advantage is that the power comes directly from the crankshaft pulley with no intermediary. The electric motor system advantage is that the pump only runs "on demand," but it's huge potential disadvantage is the brutal load on the charging system and battery - the power comes off the crankshaft still, but goes via a belt to the alternator, which now works a lot harder, and has to be stored in the battery, which also will see harsher usage/charge cycles. Ignoring that it could all be inspected and redone as necessary, it also threatens all the vintage wiring in these circuits with loads they might not handle well. Now that the big metal is on the truck, I have to install the hydraulics (pulley, pump, valve body, hoses and controls) and the wiring for the lights. |